Wednesday, October 31, 2012

BOD for Monday - 10/29/12...

Hi everyone!  I've got another Book of Days page to share with you today.  I didn't have a chance to take photos along the way this time, but I can still explain the layers for you.  There aren't as many as usual, cuz I didn't have tons of time to put into it....

I started out with a heavy coat of Color Shine spray ink in the following colors:  Mustard, Primrose, Georgia Peach, and Sweet Cherry...
 Note the difference between the left side of the page, and the far right where the diecut paper is.  The left side was gessoed first, which causes the ink to bead up.  The diecut piece is not gessoed so the ink soaks right in. 


 Here's the finished page...
I took a flat paintbrush and brushed the wet mist straight up from the bottom of the page; just enough to mix the colors a little.  I had to dry that layer with a heat gun for a few minutes to get all that ink to dry on top of the gesso. Next came the collage bits.  A mailing label from Papaya Arts, A magazine image of a galapagos island booby, a piece of vintage text, and the word "shapeshift" from a magazine. Then I added the label with the "new week" alphas on it, and doodled three flowers.  The flower petals are colored with prismacolor premiere pencils.  Finally, I wanted to make the two sides of the page blend, so I used the same blue neocolor II crayon on the text piece the booby is standing on, and the centers of the flowers.

At the end I added the journaling and doodling and I was done! 

In other news, I've got a secret and I can't wait to share!  I should be able to tell you tomorrow...

Monday, October 29, 2012

Friday's BOD - "Magic..."

Hey everyone!  I hope your weekend has been fabulous!  Before my new week starts, I want to share last Friday's Book of Days page with you!

Here's how it turned out...
I wanted to sum up how my first week of doing the Book of Days felt, and it really did feel like magic.

 Here's the step-by-step...

First step was a light coat of gesso...


Heavy body acrylic paint applied with a credit card...


Left over collage pieces from earlier in the week...


I gessoed through a Balzer Designs stencil (forgot to photograph - sorry), and then sprayed amethyst and tinsel Color Shine Mists over the top...


After rubbing the ink in, I added more acrylic paint over the top...

 More gesso...


for some reason the diagonal corner was bugging me, so I cut it off.  Now I wish I wouldn't have done that, but experimenting is what it's all about, right?  It will be a challenge to create on the spread behind (which you can now see peeking through), so that it isn't so distracting. Added collage bits, and then dark purple inktense pencil around the edges...

 And finished it with some details - a photo of Stevie Nicks, some rub-ons, stickers, and a postage stamp, and of course, journaling.  The title was written with white acrylic ink (my new favorite thing!)


I'm excited to start week two in my Book of Days!

Thanks so much for visiting my friends! I will see you again soon!

Sunday, October 28, 2012

The Reluctant Bumblebee...

Today was my monthly crop with my girlfriends and we had a lot of fun!  I had time to finish another Scrapfest project from my Lily Bee workshop...

Here's the photo from the Scrapfest description.  The layout I finished today is the middle one...


and here's how mine turned out.  It's about my sister Renee's kindergarten bumblebee experience...


 I added the little bee using one of the Lily Bee paper buttons as his face.  The holes became the eyes, a little yellow cardstock for the body, and I doodled the rest.  I tried to make him look reluctant.  I made a flip-up for the journaling because I needed the extra room for the story.  The rest is below...


So, how cute is my sister as that bumblebee?!!!  I just love that photo!

I picked up a bunch of Simple Stories Sn@p! stuff for my 2013 Project Life album.  It's going to be hard to wait til then to use it!  Eek!

I hope you are having a super-fabulous weekend my friends!  Thanks so much for visiting!

Thursday, October 25, 2012

Book of Days "Love..."

Thanks for the feedback on my Book of Days pages!  I'm glad you like the step-by-step photos.  I will try to do more of those for you!  Here's one for my latest Book of Days journal page...

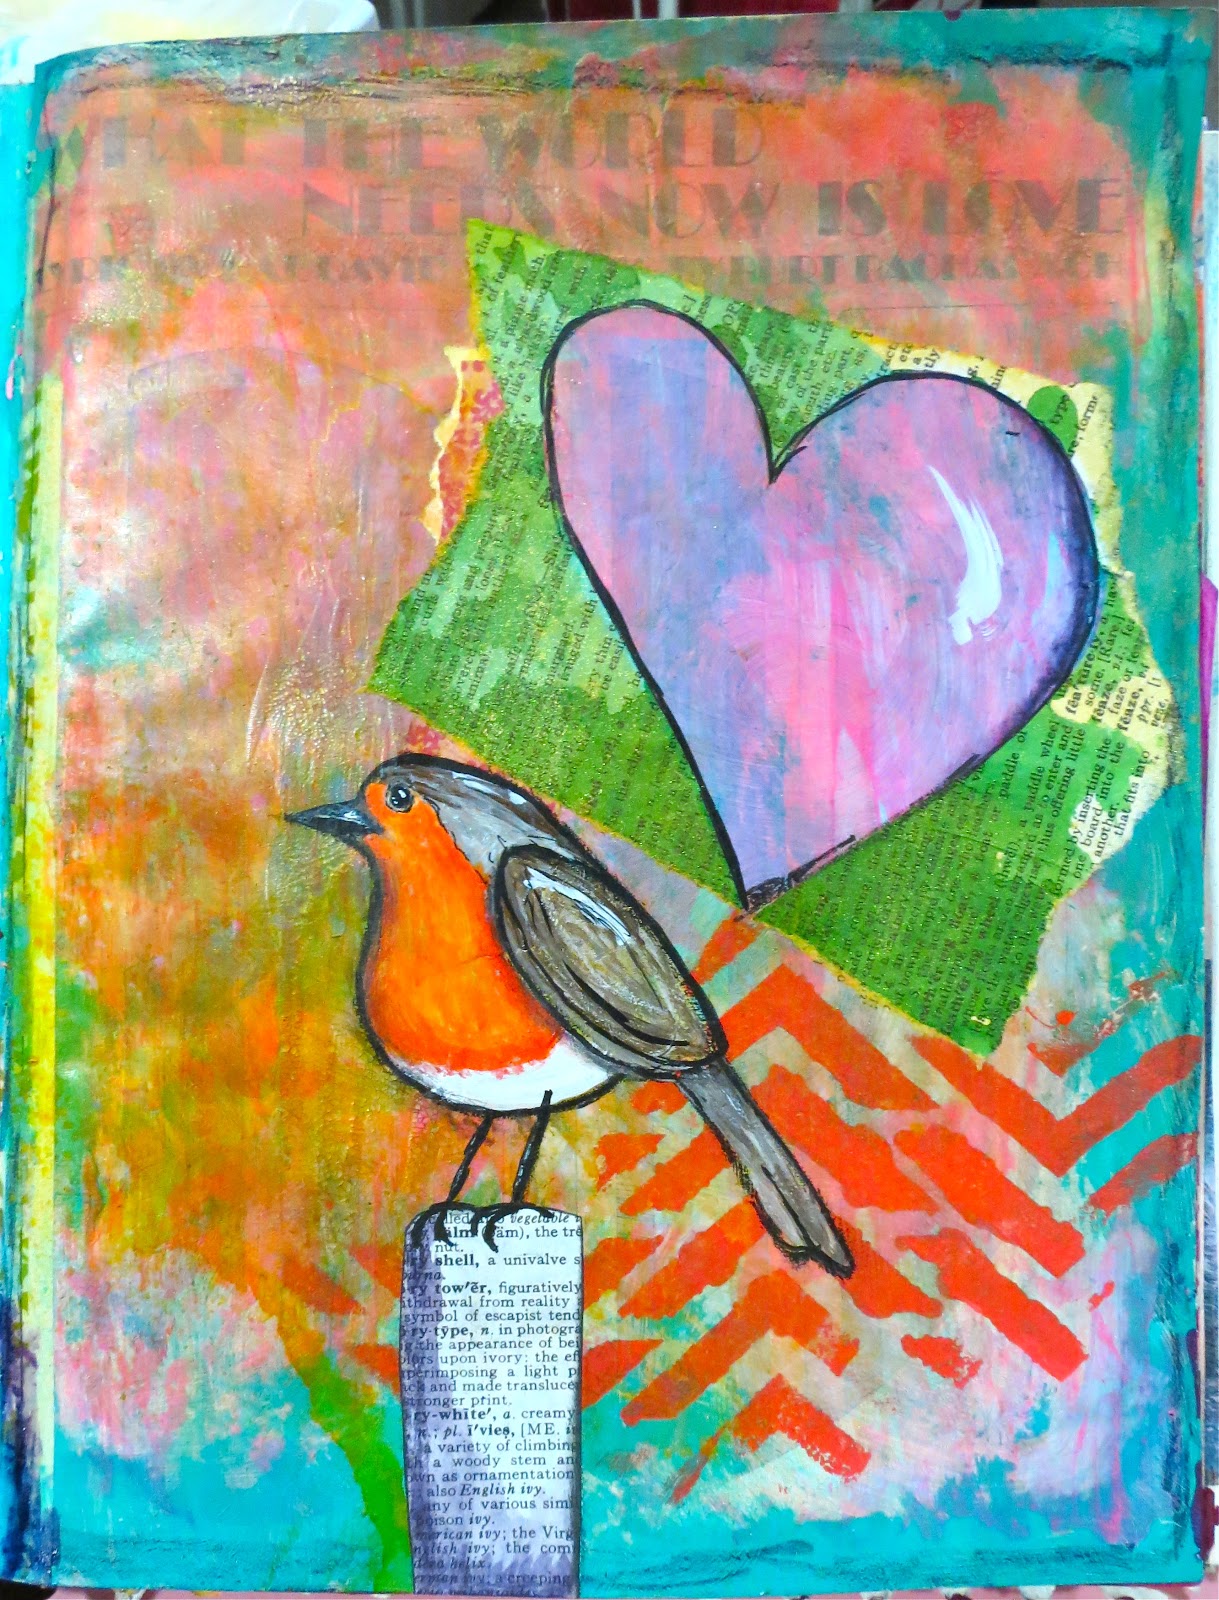
Here's the final page...

And here are the steps it took to get there...

The original base page is the sheet music for "What the World Needs Now is Love."  I added some hot pink craft paint, and added Tim Holtz Rock Candy Crackle Paint in a few places over the top of that. Then scrapbook paper; red acrylic paint through a Julie Balzer stencil, and turquoise paint over the top of that.  I wiped a bunch of the turquoise paint off so you could see some of the crackles.  Then added a little brown ink with a sponge to emphasize the crackles some more...  


I thought I'd add a heart to go with the "love" theme.  I cut one out of some misted dictionary paper, but discovered I liked the negative space better, so I stuck that on with a glue stick...


Then I covered the negative space up with the original heart, and sprayed some yellow ink over the top of the page...

This made me think of how I love birds, so I drew the basic shape of a bird with my china marker, and added a little stoop for him to stand on...


Started filling in the details of the bird with white acrylic ink, and grown and silver acrylic paint...


Filled in his belly with orange paint, then added some detail and shading with Inktense colored pencils and india ink...


 Added journaling for the day, and realized I wanted to write more than I had room for...


so I added a tag...

Cut the word Love out of that same dictionary paper that the heart was cut from and stuck that on the front of the tag with a glue stick.  And that brings us back to the finished page...

To learn more about the Book of Days project (or to start your own), click here to go to Effy Wild's Forum.

In my last post, Kelly asked about the origin of the phrase "It is well with my soul."  Thanks for the question Kelly!  All I know about the phrase is that the song is originally an old christian hymn.  There is a little bit of background in the description of the video here.  I only know about it because it's on my Jars of Clay album.  For me it's all about being at peace in your heart no matter what is going on around you.

I can't remember if I've mentioned that I signed up for the Life Book 2013 workshop?  Are any of you participating in that one?  It's a year long art journaling endeavor and it looks fantastic!  Tam Laporte (aka willowing) is coordinating the event, and she has her Life Book for this year posted on her blog this week. After seeing it, now I'm REALLY inspired!  Check it out here.

Also, we've extended the deadline for our current set of Scrapping The Music challenges, to accommodate this busy time of the year.  We'd really LOVE to have you play along with us!  Check it out here!

That's all for today folks! Let me know if you have questions!  Thanks so much for visiting and I will see you again soon!

Wednesday, October 24, 2012

BOD Post - "It is well with my Soul..."

Hi friends!  Just a quick post today to share my Book of Days page.  Just like yesterday, I let go of any preconceived notions about the end result of my page, and just enjoyed the process.

Here's how it turned out...


Gesso, acrylic paint, paper scraps, magazine image, pencil, marker and india ink.

Once again, a lyric popped into my head while doing my page, and became the title.  It's from "It is well with my Soul" (Jars of Clay version is the one I have - it's here).

I hope you are having a wonderful week!  Thanks for visiting and for your comments!

Tuesday, October 23, 2012

Book of Days...

I don't even know how I came across Effy Wild's "Book of Days" group.  It might have been when I was blog-hopping amongst the teachers' blogs for Lifebook 2013.  But somehow, I landed there, and fell in love with the idea of a "Book of Days!" 

I have been tinkering with developing an art journaling ritual for quite awhile now.  I do a lot of art journaling, but as you may known, it's kinda all over the place - in this book and that book.  What I really want is to have a process I can rely on.  Something separate from any "projects." Something that I do every day, naturally, just like brushing my teeth.  I started my Blue Velvet journal with this idea in mind, but I didn't get much past the first couple of pages.  

Effy Wild has an online community/forum that is free and she provides inspiration for the Book of Days (or BOD for short) process with weekly videos!  It's super cool!  Check it out here!

I was so inspired by what I was learning, that I decided to enroll in the "Book of Days Boot Camp" over the weekend, and obsessively completed the whole course!


 Effy's "Book of Days (or BOD for short) video for today was so inspiring!  I decided to follow the same steps that she took, but with my own supplies and style, and see what would happen.  I watched the video, and watched each layer she added, and then paused the video and added a similar layer. It was an awesome experiment because it forced me to let go of what the end product was going to look like and just trust the process! Here's how my page turned out...


Here are the steps it took to get there.  (Note: Each layer was dried with a heat gun before proceeding)...
 the page already had some collage and mist on it.  I added a layer of gesso


 modeling paste applied through a stencil...


 tons of mists over the top - Heidi Swapp's new "Color Shine" line in Georgia Peach, Sweet Cherry Red, and Tinsel...


 Added some OA Sprinklers in the new Woodland Park colors, and let them drip...


 Stenciling with Maya Mist and a Tim Holtz stencil...


 Drew the basic shape of a girl with a china marker...


 added some more details...


 started to fill her in with acrylic paint...


 finished filling in the details, and did some outlining with india ink and a brush...


 and the finished page - with journaling and a favorite lyric from Peter Himmelman. 

If you want to check out Effy Wild's Online community - click here! You can find out about the boot camp workshop here.

Thanks for visiting - I really appreciate it!  See you again soon!


Monday, October 22, 2012

Custom Notebook for only $2...

Hey there and Happy  Monday!  I just wanted to share with you a fun little deal I learned about through Lain Ehmann's blog.  For a limited time, you can get a custom notebook for only $2.00 from Inkgarden.com!  I did it, and I am ecstatic about how it came out - both the quality, and the vibrant colors of the printing!

Here's the one I did.  I just uploaded one of my scrapbook pages for the cover...


I filled in the extra space on the back cover with one of their premade patterns...

On the inside cover I chose another premade background, with a calendar overlay; and added a raven (of course!).  It was super simple!

I couldn't believe how easy it was and I just love my new little notebook!  The lined paper is good quality, and the size is about 5" x 7". 

The offer expires on November 2, so there is still time.  Click here to go to Lain's blog and check it out...!

Saturday, October 20, 2012

More Project Life - September is complete...!

September's Project Life pages are done! - Yeayyy!

Here's the spread for September 24 - 30, 2012...
 It was a hectic week, and I think it shows - ha! 


Closeup of the left side...
 This was the week before our Seattle trip, so it is filled with all of my planning info, packing lists, etc.  It was super fun to have a place to put these things, cuz I love the planning process so much - it's half the fun!

 Here's a closeup of the right side...
My favorite part of this page is the text I got from my Sister Renee, when she got her new little friend!  Did you know that you can take a photo of your iphone screen at any time?  All you do is press your top "on/off" button at the same time as your main button on the front of your screen, and it takes a photo!  Click here for a tutorial.

I'm still trying to decide what to do for my 2013 Project Life.  I'm starting to learn towards the Snap line by Simple Stories.  The colors are so bright and fun!  Part of me wants to not buy anything and just make my own inserts.  Hmmmmm..... it's fun to have options!

Thanks so much for visiting and I will see you again soon!

Friday, October 19, 2012

Project Life Update...

Hey there everyone!  I finished my next Project Life spread last night. It's from September 17 - 23...

Here's a closeup of the left side...
Sorry for the glare on this photo.  I included a gum package on this page just for fun.  Some year in the future it might be interesting that we had dreamsicle flavored gum, right?  Plus - the package is orange!

Here's a closeup of the right side...
The 6x6" pockets worked out well for this one - my four crop layouts fit perfectly in the top right pocket.  The bottom pocket holds the beautiful handmade card that I got from Rosalie, along with the cow stamp I bought, which I stamped on the envelope for reference. Thanks Rosalie!

Thanks for visiting, and I will see you again soon!

Wednesday, October 17, 2012

I'm Back from Honeymoon Six - Guess where we went???

Here's a hint...

SEATTLE!!!  and the really exciting part is...

We took the train!!!


Yep - we had a sleeper car and everything!  It was such an exciting adventure!  Both the train trip and our time in Seattle!  We took over 1200 photos - EEK! 

I've got so much to share I don't even know where to start!

I'm excited to get back to my daily blogging again.  I've missed keeping in touch with all of you!

I want to send a big Thank You out to my friend Sharon Fritchey, who handled the administration of the Scrapping The Music blog while I was away - and did an awesome job!  A new set of challenges, hosted by Phinner just went up on the 15th.  Check it out here!  THANK YOU SHARON and PHIN!

Also, I'm so excited for True Scrap 4, which is this weekend - anyone else signed up for it?  There is a pajama party on Thursday evening to kick it off - I'll be there!

I'm off to get started on Project Life!  I can't wait to work on it!

Have an awesome day my friends, and  I will see you again tomorrow!

Thursday, October 11, 2012

So Cute Together (Sketch Layout)...

Hey there everyone!  I hope your week is turning out awesome!!!  Quite awhile back, I was asked to do a layout for the "Sunday Sketch" blog series over at Studio Calico, which was so sweet!  There ended up being a glitch and it never got posted over there, but I still want to share the layout that I made with you!

The sketch they sent me was based on this beautiful layout by Nicole Samuels

Here's what I came up with..

My favorite thing about Nicole's gorgeous layout was the colorful grid of squares; so I wanted to stay true to that.  I had these three instagram photos of my hubby Michael and our cat Willie that I've been wanting to scrap, so this seemed like the perfect time!  I stitched everything down and then added a big circle of neocolor II crayons to provide some contrast with the squareness of the grid.  It was so much fun to fill the grid with little embellies! A hand-drawn title and some doodling with poster-paint markers, and it was finished!
Thanks so much for visiting and I will be back soon!